GameDev Tutorial - Creating a Simple
Game
 |
Step 6 - Player
Settings and Inventory
There are two components to this
step. Firstly we must define the global settings. These
include which map is the first map to be loaded when
playing the game (where the game starts), how the display
scrolls around the player, what the inventory looks like,
and what items are in the inventory. Secondly we must
define how the player interacts with an individual map.
This includes specifying one sprite on the map as the
player sprite, and defining how the player interacts with
various tiles, and how these interactions affect the
inventory.
|
Global Player Settings
To access the global player settings,
select "Player Settings" from the view menu in the main
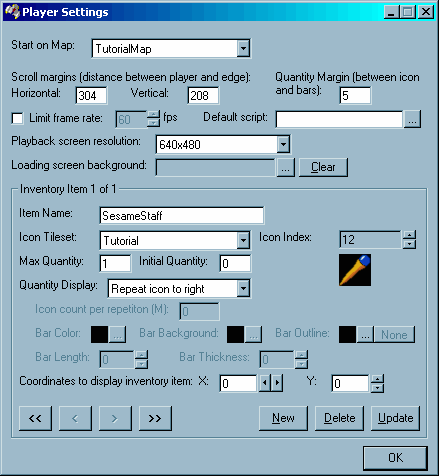
project window. The first field you'll see is "Start on
Map". As the name suggests, this selects where the game
starts if there are multiple maps in the project. We only have
one map so our choice is easy. Select "TutorialMap"
from the list.
The next two fields indicate how the map
scrolls around the player. The defaults of 32 will allow the
player to get within 32 pixels of the edge of the display before
the map scrolls. Let's change this so the player doesn't have to
get so close to the edge of the display. As a matter of fact, we
can calculate what the value needs to be so that the map always
scrolls when possible. The scrolling occurs such that the nearest
edge of the sprite is at least N pixels away from the edge of the
map. That means the display width (640) minus the sprite width
(32) all divided by 2 gives us the horizontal margin. So,
(640-32)/2 = 304, enter 304 into the "Horizontal"
field. The vertical margin is calculated as (448-32)/2 = 208,
enter 208 as the vertical margin. (448 because this is the height
of the map display -- this is the number we're concerned with in
these calculations.)
The "Quantity Margin" is fine
at 5. This simply determines, for instance, how far the
"money bar" is from the icon representing the
"money item" in the inventory, assuming you have an
inventory item called "money".
 Now we'll create a
couple inventory items. Our first item will be called
"SesameStaff" so enter this into the "Item
Name" field. "Icon Tileset" should be set to the
only available tileset ("Tutorial"). Click the up and
down arrows next to the "Icon Index" field to scroll
through the different icons in this tileset. Continue scrolling
until you find the image of the staff that we drew in Step 1. This icon will represent ownership of the staff.
Set "Max Quantity" to 1 and "Initial
Quantity" to 0. This will be an item that the player either
owns or does not own -- no owning multiple staffs. Setting
"Quantity Display" to "Repeat icon to right"
will display a single staff icon when the player owns the staff,
and nothing when the player does not own the staff. (This setting
would display more staffs to the right if Max Quantity were set
above 1.) Now set the coordinates for the display of this
inventory item. X and Y should both be 0 (these values are
probably already filled in by default). That completes this
inventory item, so click the New button to create it.
Now we'll create a second item. Name this
one "Scraper". Search through the icons until you find
the icon representing the scraper item drawn in Step 1. Max
Quantity for this item should be a bit larger, let's use 10.
Initial Quantity we'll leave at 0. The quantity display for this
one will be more interesting, we'll use a vertical bar to
represent how many the player owns; pick "Vertical bar at
right". Pick some interesting colors for the bar and bar
background (I used purple and dark grey respectively). Just for
fun, press the "None" button for the bar outline. As
long as the bar background constrasts with the screen background
(usually black) the outline isn't really necessary. Set the
"Bar length" to 32 pixels (for a vertical bar, this
determines how many pixels high the bar is from the base of the
tile image). For the bar thickness, a value of about 4 should be
good (that's the width of the vertical bar in pixels). The
position of this item should be X=35 and Y=0. This will draw the
"Scraper" to the right of the "SesameStaff".
Finally click the New button to save the new inventory item.
You should be able to use the left
("<") and right (">") buttons at the
bottom left corner of the dialog to switch between your two
inventory items now and see all the details for the two items.
This is all that needs to be done for the global player settings,
so when you're done, click OK.
Map Settings
Open up the map editing dialog again
(Maps from the View menu) and select TutorialMap. Then click on
the Player Interacton tab. This is where all the map-related
player settings are defined.
You may have noticed that, while we have
defined a player sprite template, a player sprite definition and
a player collision category, we never actually indicated to the
program which sprite is the player sprite --
we've just been using the name "Player" to define a
number of things. The program needs to know which sprite really
is the player because that sprite will scroll the map and
interact with the inventory. The first field on this page is used
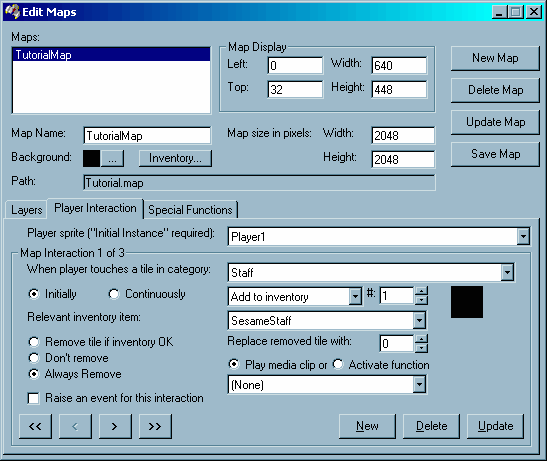
to do exactly that. So from the "Player sprite" field,
select "Player1".
Another thing you may have noticed is
that, when we defined the inventory we didn't actually define
what causes the inventory to change. Just because an inventory
item is represented by (for instance) the image of a staff, that
doesn't necessarily mean that this same tile in
the map will be used to represent the staff item that you can
pick up. (It may be the case that the inventory has to display
the items in a different size than the map tiles, and so has to
use a different tileset.)
 So
that's what the rest of the tab is dedicated to addressing. Our
first interaction will define how the player gets the staff into
the inventory. Select "Staff" as the tile category for
the interaction. Then select the "Initially" option.
This setting doesn't make much difference in this case because
the tile will disappear as soon as it is touched anyway. If it
were to stay on the map, selecting "Initially" would
ensure that the player only gets 1 staff each time the staff tile
is touched, instead of infinitely stocking up on staffs as long
as the player is touching the tile (assuming Max Quantity is
big). The next field indicates what action to perform on the
inventory when the "Staff" tile is touched. Select
"Add item to inventory" for this field. As of
version 1.4, you can also select how many items are added to the
inventory for this interaction. In this case, we only want to add
1 staff to the inventory when the player touches a staff tile, so
leave the "#" at the default value of 1. In the
"Relevant inventory item" field, select the SesameStaff
item we defined earlier. The next option determines how this
interaction affects the map. Select "Always Remove" to
indicate that the staff should be removed from the map even if
the player already had a staff and couldn't pick up another one
(I pick this option somewhat arbitrarily in this case, pick
whatever you like). In the "Replace removed tile with"
field, use the arrows or enter 0 in the field. Tile index 0 is
the background tile for the map and represents an empty space.
This effectively makes the staff disappear when you get it.
The "Play media clip" / "Activate function"
field is used to specify a sound effect or special function to
activate when an interaction occurs. This tutorial was written
before that feature, but feel free to add a sound effect. The
last field is used for scripting only which we aren't concerned
with at the moment, so leave it unchecked. That's the end of this
interaction, so click the "New" button to create it.
Now we'll create a second interaction to
define how to pick up the "Scraper" item. Select
"Scraper" as the tile category. Relevant inventory item
is scraper. For this item select "Remove tile if inventory
OK" to ensure that the tile is only removed from the map if
the player has room in the inventory to pick it up. Everything
else can remain the same as it was for the SesameStaff item.
Click New to add the interaction for the "Scraper".
Our third and final interaction will
define how the scraper works. Select "Exterior" as the
tile category. Select "Subtract item from inventory" as
the inventory effect. Relavent inventory item is still the
Scraper. "Remove tile if inventory OK" in this case
ensures that the "Exterior" tile is only removed if the
player has a Scraper. The "Replace" tile at 0 will
replace the Exterior tile with empty space. Finally click new to
create the third interaction.
All the player parameters have been
defined. It's now possible to actually play the game to some
extent. We have not yet defined a way for the blocked passage to
open, but everything else should be working sufficiently well
that selecting "Play" from the "File" menu on
the main project window will give a good idea of what the game
will work like. (Press "Q" to quit the game and return
to the editor.)
This concludes step 6 of the GameDev
tutorial - Player Settings and Inventory.
Return to the main
tutorial page.
Jump to the next step
in the tutorial.