GameDev Tutorial - Creating a Simple
Game
 |
Step 3 -
Creating a Map
The map editor within GameDev
opens a full screen display in order to ensure the
desired color depth is visible. This may make it
difficult to follow this tutorial on-screen, so before
beginning you may wish to print this page out for
reference as you proceed with this step of the tutorial.
However, if that's not an option, GameDev does allow you
to Alt-Tab between the full-screen display and the
desktop.
|
Editing maps is where the real fun comes
in. You may choose to split up your games into small distinct
parts, or to make one gigantic world map. GameDev is designed to
support maps up to 32,767 tiles wide or 32,767 tiles high (32,767
wide and high is not recommended as that would
require 1 GB of memory). Approaching these limits, it becomes
quite cumbersome to navigate around in the map editor anyway. (A
billion tiles is a lot of eggs to put in one basket if something
were to happen to the map file!)
Map sizes are specified in pixels while
layer sizes are calculated (in tiles) behind the scenes based on
map sizes and scrolling rates. This is done because different
layers can scroll at different rates so they require a different
number of tiles in order to have valid content across the
entirety of one fixed-size map. Since scrolling is done at the
resolution of 1 pixel, the size of the map is specified in
pixels. For instance, a layer that scrolls horizontally at half
(0.5) the speed of the map would have approximately half the
number of tiles as a similar layer that scrolls at the same speed
as the map (1.0).
Let's get to the map editing dialog,
then, and get started! Select "Maps" from the View menu
on the main project window. First we need to create a map which
is sort of a container for layers (where all the tile data are
stored). The map itself does not contain any tiles. Type
"TutorialMap" in the "Map Name" field to give
this map a unique name. Under "Map Display" enter
"0" for Left parameter, "32" for the Top
parameter, "640" for the Width parameter and
"448" for the Height parameter. This sets up the
display of the map to take up the entire screen except for 32
pixels at the top, where we'll eventually put inventory
information.
In the "Width" and
"Height" parameters, enter "2048". This is a
reasonably small map, good for a tutorial (2048x2048 pixels).
Click the "New Map" button and note that
"TutorialMap" appears in the "Maps" list. Now
that a map is created, the lower half of the dialog box can be
accessed. (The lower half applies entirely to the selected map.)
Next we create a layer. To do this, first
enter all the layer parameters. "Main" would be a good
name for our first layer so enter that in the Layer Name field.
From the "Tileset" dropdown box, select the only
tileset available. All our graphics are in one tileset in this
tutorial. To make this layer scroll at the same speed as the
overall map, enter the value 1 into the "X Scroll Rate"
and "Y Scroll Rate" fields. Transparent layer should
not be checked. There should always be one non-transparent layer
at the bottom of the stack of layers to overwrite (clear) all the
graphics from the previous frame. Make sure that
"TutorialMap" is selected in the top box (list of maps)
to indicate that this layer is to be added to that map. Then
click the "New Layer" button to create the layer.
Now it's time to go into the full screen
map editor and start placing tiles. Select the layer in the
"Map Layers" box and click the edit button. A big blank
display appears:
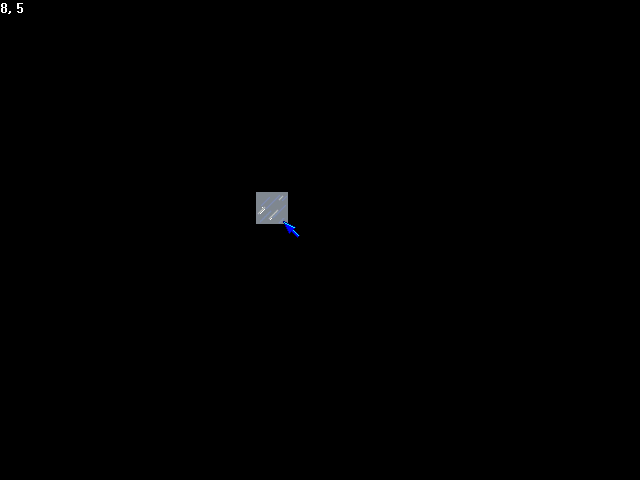
As the mouse moves around
you can see the currently active tile jump into the different
spaces on the layer under the mouse. The numbers at the top left
corner indicate the current coordinate of the the tile (x,y).
Moving to the edge of the screen scrolls the map (which doesn't
look nearly as interesting as normal when the whole map is
blank).
Holding down the right mouse button will
display the menus. This is also how other tiles can be selected.
Let's use the tilematch defined in step 2 of the tutorial and see
how it works. Hold the right mouse button, move the mouse over
"Tilematch" and then "TutorialMatch". Release
the mouse button and now TutorialMatch is selected.

Try drawing a few small structures top
see how the Tilematch functionality works.
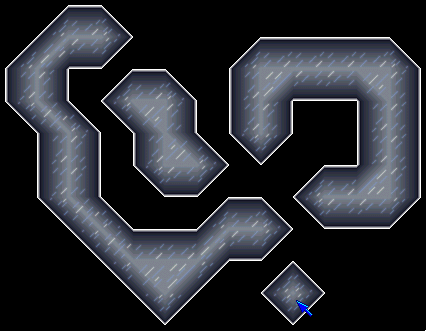
If you go to the Tilematch
menu and select "Eraser" (Both
"TutorialMatch" and "Eraser" will be colored
red indicating that this is the eraser specifically for the
TutorialMatch item) you can erase areas of these structures,
keeping their edges in tact and looking correct. Note, however,
that since Tilematch was designed for 2-by-2 blocks, if erasing
tiles results in anything only 1 tile wide or 1 tile high, it
will not look nice. If you ever have need of smaller structures,
you will either have to draw the graphics for these and insert
them manually, or create a smaller tileset and define a Tilematch
for it, then create a layer using that tileset.
Now, the quickest way to get
an interesting map to play around with is the Maze function. This
will automatically generate a maze of tiles using the currently
selected tile or Tilematch. Hold the right mouse button, go to
the Maze menu and select "Normal". This selection will
indicate a normal sized maze which has smaller passages than the
"Large Scale" maze. Move the mouse to the top left
corner of the screen to make sure the map is scrolled all the way
to that corner. Now move it down (remember the top 32 pixels are
not part of the map display) until the coordinates appear as
"0,0". Press and hold the mouse button, dragging the
mouse to the lower right corner. The map will scroll. Continue to
hold here until the coordinates read "63,63" where the
map will stop scrolling. Release the mouse button and watch as
the maze is generated. You can continue to scroll as the maze is
generated, and see pieces of the map hollow out as passages are
added.
Now we need to add some
features to the map that we can use in defining sprites and
special functions. First let's add a couple paths for sprites to
travel along. Select "New Path" from the Paths menu.
Type the name "TutorialPath1" when prompted for a name,
then press Enter. Left click the mouse once at some point in the
map above a solid piece of ground. This point will correspond to
the top-left corner of a starting point for a sprite, so be sure
there are at least 32 pixels of empty space below and to the
right of the point. Leave extra room (don't try to count pixels).
That point will be the starting point for the player. Right click
to terminate the path as a single-point path. Now let's add a
complete path for another sprite.
Before adding the new path
this time, select "Toggle Grid" from the Paths menu.
This will snap the path point to the corners of the 32x32 pixel
tiles in the layer. Once again, select "New Path" from
the Paths menu and enter a name: "TutorialPath2" is
good. Now click exactly 32 pixels away from some wall that faces
left. This shouldn't be difficult this time because the point
will snap to the right distance when the mouse pointer is moved
near a wall (just be sure not to get the point right on the edge
of the wall or too close to a diagonal surface). Positioning the
start of the path at this position ensures that a sprite (32
pixels wide) will start out flat against the wall.
 |
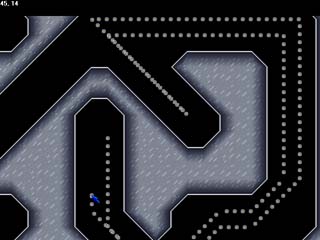
Add some points to the path by
clicking the mouse in nearby locations. Each point should
have direct lines to the neighboring points that do not
pass through (or too near to) any obstacles. Add points
that lead back to the starting point of the path so that
after the sprite has completed following the path, it can
get directly back to the starting point from the ending
point. The starting point does not need to be on top of
the ending point. To finish the path, click the right
mouse button. Clicking the right mouse botton terminates
the path without adding the location
under the mouse pointer as a point in the path. Remember
that there should be a 32x32 pixel square of empty space
below and to the right of each pixel throughout the path. |

|
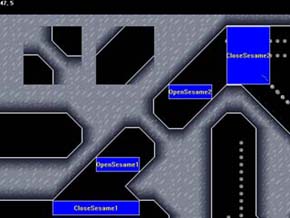
Now
we're also going to add some special functions that can
be used later to define a map-altering event. First, find
a section in the maze that can be closed off with a small
(4x4) block of tiles. Also find an area of the map that
can be filled in as solid without disturbing access to
the rest of the maze. Using the example at the left as a
guide, copy the 4x4 block of tiles representing the open
passageway (using the copy command from the menu, drag
around the area) and paste it into the solid area of the
map (the solid area does not have to be nearby as seen in
the example). Note that blocking off a horizontal or
vertical passageway would require a 2x5 block of tiles
rather than the 4x4 block for the diagonal passage. Now
select the TutorialMatch Tilematch. Block off the passage
and also copy the blocked passage (same size!) into the
filled-in area of the map. Now
we add some special functions. Select "Add
Special" from the menu and enter
"OpenSesame1" for the name. Click and drag a
box for this function that spans accross the passage
right next to the point where it's blocked off. Add
another called OpenSesame2 on the other side. Add two
more called "CloseSesame1" and
"CloseSesame2" in positions that the player
would have to touch after exiting the other side of the
passage and after passing through the
opposite OpenSesame.
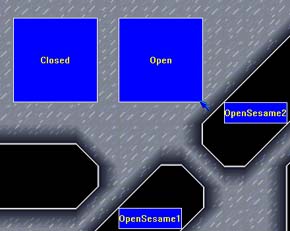
Finally two functions need to be
added to indicate where the blocks of tiles are that will
be copied when these functions are activated. Add a
function called "Closed" and place it over the
block of tiles that represents the closed passageway. Add
another called "Open" and place it over the
block of tiles representing the open passageway.
|
 |
Finally, add a few of
those inventory tiles to the map. One tile representing a staff
should go on the accessible side of the closed passage (the same
side of the blocked passageway as the single-point path). The
staff will be used to open the passageway. Then also add some
"scraper" items on the opposite side of the passageway.
Each one of these will be used to scrape away one tile of wall.
With this in mind, add as many of these as you'd like to the map.
That's about all there is
to map editing. Some keyboard-related points not mentioned above:
- The arrow keys can
be used to scroll the map by screen-sized increments
quickly.
- The scroll-lock key
can be used to lock the map onto the player sprite (if
one exists) and enter a sort of "playing" mode
within the map editor.
- Escape exits the map
editor.
- Ctrl-S was used to
capture the screenshots used in this tutorial. Images are
saved as bitmaps in the directory where GameDev.exe
resides.
We have all we need on the map for this
tutorial. Select Close from the menu or push Escape. This would
be a good time to save the map and save the project. Click the
"Save Map" button on the "Edit Maps" dialog
and pick a file name for the map. Then select "Save"
from the file menu on the Project dialog and overwrite the older
version of the project if it exists. Doing this will save the
project with it's reference to the new map in it's saved location
(relative to the project file).
This concludes Step 3 of the GameDev
tutorial - Creating a Map.
Return to the main
tutorial page.
Jump to the next step
in the tutorial.
