GameDev Tutorial - Creating a Simple
Game
 |
Step 2 -
Defining Tile Matching
Tile matching is defined in
separate tile matching windows. There's one window to
create, delete and rename tile matching definitions, as
well as load existing definitions for editing. This is
called the management window. The other window is used to
perform the actual definition of matching tiles. Both
windows will be described in this step of the tutorial.
|
To get started, select
"Tile Matching" from the view menu in the main project
window. This brings up the tile matching management window. There
are currently no "TileMatch" objects defined. There
should be one tileset containing the graphics from step 1 of the
tutorial. This tileset was named "Tutorial". If you do
not have this tileset in the project, you can load it from the
existing image: Select "TileSets" from the View menu in
the main project window; enter the name "Tutorial" in
the tileset name box; ensure tile width and height are both 32;
click "Load Image" and locate Tutorial.bmp.
To create a tile matching definition or
"TileMatch" for the Tutorial tileset, click on
"Tutorial" in the "Available Tilesets" box
and click the Create button. When prompted for the name, enter
something like "TutorialMatch". When this step is done
the TileMatch definition screen appears.
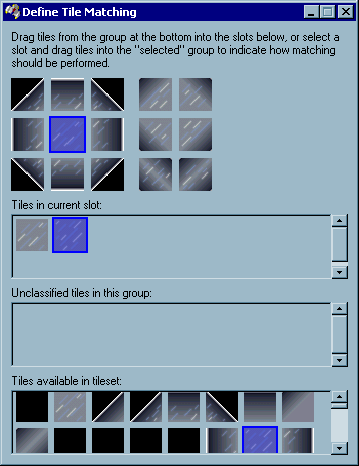
 In this dialog
there are 15 slots into which tiles can be categorized. For the
sake of reference let's give them these names, respectively, from
top left in reading order to the bottom right:
Top-Left, Top, Top-Right, Southeast Inner
Corner, Southwest Inner Corner, Left, Center, Right, Northeast
Inner Corner, Northwest Inner Corner, Bottom-Left, Bottom,
Bottom-Right, Northwest-Southeast Joiner, Northeast-Southwest
Joiner.
Images in the bottom box represent all
the tiles in the tileset. Drag images from here in order to
classify them as part of the TileMatch. They can be dragged into
one of the slots at the top to categorize the tile in that slot.
They can also be dragged into the "Tiles in current
slot" box in which case they will be classified into the
currently selected slot. This box displays all tiles in the
currently selected slot and allows you to remove tiles from the
slot by dragging them back to the tileset box.
Tiles can also be dragged into the
"Unclassified tiles" box. This is the category reserved
for tiles that can be affected by this tilematch, but are never
drawn onto the screen by using the tilematch.
Using the image above as a guide, drag
tiles from the tileset at the bottom into the slots at the top.
There should be only one tile per slot unless you have defined
two tiles for the "Center" slot as was done in the
included Tutorial.bmp. The graphics created in step one only
provided for one tile per slot excepting the center slot.
Although the tutorial tileset contains some extra tiles without
the smoothed diagonal lines which duplicate existing tiles that
do have diagonal lines, these should not be included in the
tilematch as they will not fit very nicely with the rest of the
tiles.
All the tiles that are half black and
half grey with a diagonal edge belong in the corner positions
"Top-Left", "Top-Right",
"Bottom-Left" and "Bottom Right". Edge tiles
go between these. The tile with an "exterior pixel"
(light grey) at the top-left, and a constant grey covering the
bottom right half of the tile goes in the "Southeast Inner
Corner" slot. Three similar tiles follow the same pattern.
The last slot has "exterior pixels" at the top left and
bottom right. The inner grey part slopes up and to the right.
This is the "Northeast-Southwest joiner". The prior
slot is similar, but flipped.
There is no need for the
"Unclassified tiles" box in this tutorial. This would
be used if, for instance, there were other metal blocks that you
wanted to adjoin nicely to blocks in this TileMatch, but did not
want this TileMatch to generate these blocks itself when editing
the map.
When all the slots are filled in
properly, this TileMatch is done! Close the dialog and move on to
the next step to see the real magic! Before you do, you may wish
to save the project at this point. From the main project window,
select Save from the File menu. TileMatch information is stored
in the project file.
This concludes Step 2 of the GameDev
tutorial - Defining Tile Matching.
Return to the main
tutorial page.
Jump to the next step
in the tutorial.